Configuring an SNAT ECS
Scenarios
Together with VPC route tables, you can configure SNAT on an ECS to enable other ECSs that have no EIPs bound in the same VPC to access the Internet through this ECS.
The configured SNAT takes effect for all subnets in a VPC.
Prerequisites
You have an ECS where SNAT is to be configured.
The ECS where SNAT is to be configured runs Linux.
The ECS where SNAT is to be configured has only one network interface card (NIC).
Procedure
Log in to the management console.
Click
 in the upper left corner and select the desired region and project.
Under Computing, click Elastic Cloud Server.
On the displayed page, locate the target ECS in the ECS list and click the ECS name to switch to the page showing ECS details.
On the ECS details page, click the NICs tab.
Click the NIC IP address. In the displayed area showing the NIC details, disable the source/destination check.
By default, the source/destination check is enabled to check whether source IP addresses contained in the packets sent by ECSs are correct. If the IP addresses are incorrect, the system does not allow the ECSs to send the packets. This prevents packet spoofing and improves system security. For an SNAT ECS that needs to forward packets, enabling the source/destination check prevents the packet sender from receiving returned packets. To stop this, you need to disable the source/destination check for SNAT ECSs.
Bind an EIP.
Bind an EIP to the private IP address of the ECS. For details, see Assigning an EIP and Binding It to an ECS.
Bind an EIP to the virtual IP address of the ECS. For details, see Binding a Virtual IP Address to an EIP or ECS.
On the ECS console, use the remote login function to log in to the ECS where you plan to configure SNAT.
Switch to user root and enter the password when prompted:
su - root
Confirm that the ECS can connect to the Internet.
Note
Before running the following command, disable the response iptables rule on the ECS where SNAT is configured and configure security group rules.
ping www.google.com
The ECS can access the Internet if the following information is displayed:
[root@localhost ~]# ping www.google.com
PING www.a.shifen.com (xxx.xxx.xxx.xxx) 56(84) bytes of data.
64 bytes from xxx.xxx.xxx.xxx: icmp_seq=1 ttl=51 time=9.34 ms
64 bytes from xxx.xxx.xxx.xxx: icmp_seq=2 ttl=51 time=9.11 ms
64 bytes from xxx.xxx.xxx.xxx: icmp_seq=3 ttl=51 time=8.99 ms
Check whether IP forwarding of the Linux OS is enabled:
cat /proc/sys/net/ipv4/ip_forward
In command output, 1 indicates it is enabled, and 0 indicates it is disabled. The default value is 0.
If IP forwarding is enabled, go to step 14.
If IP forwarding is disabled, perform step 12 to enable it.
Many OSs support packet routing. Before forwarding packets, OSs change source IP addresses in the packets to OS IP addresses. Therefore, the forwarded packets contain the IP address of the public sender so that the response packets can be sent back along the same path to the initial packet sender. This method is called SNAT. The OSs need to keep track of the packets where IP addresses have been changed to ensure that the destination IP addresses in the packets can be rewritten and that packets can be forwarded to the initial packet sender. To achieve these, you need to enable the IP forwarding function and configure SNAT rules.
Use the vi editor to open the /etc/sysctl.conf file, change the value of net.ipv4.ip_forward to 1, and enter :wq to save the change and exit.
Apply the changes:
sysctl -p /etc/sysctl.conf
Configure SNAT.
Grant all ECSs on the network (for example, 192.168.1.0/24) access to the Internet using SNAT. Example command:
iptables -t nat -A POSTROUTING -o eth0 -s subnet -j SNAT --to nat-instance-ip

Figure 1 Configuring SNAT
Note
To ensure that the configured rules will not be lost after a restart, write the rules into the /etc/rc.local file.
Switch to the /etc/rc.local file:
vi /etc/rc.local
Perform 14 to configure SNAT.
Save the configuration and exit:
:wq
Add the execute permission for the rc.local file:
# chmod +x /etc/rc.local
To ensure that the configuration changes are applied, run the iptables -L command to check that the configured rules do not conflict with each other.
Check whether the configuration is successful. If information similar to Figure 2 (for example, 192.168.1.0/24) is displayed, the configuration is successful.
iptables -t nat --list
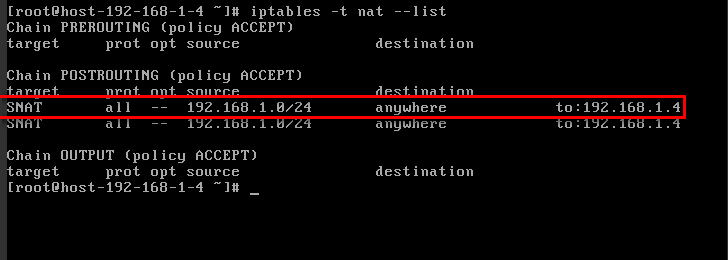
Figure 2 Verifying configuration
Add a route. For details, see section Adding a Custom Route.
Set the destination to 0.0.0.0/0, and the next hop to the private or virtual IP address of the ECS where SNAT is deployed. For example, the next hop is 192.168.1.4.
After these operations are complete, if the network communication still fails, check your security group and firewall rules deny required traffic.