Configuring WORM Retention
You can determine whether to enable WORM when creating a bucket. For details, see Creating a Bucket. When creating a bucket, if you enable WORM, you can continue to configure WORM after the bucket is created; if you do not enable it, you are not allowed to enable or configure it for that bucket later.
The following describes how to configure WORM retention after you create a bucket with WORM enabled.
Prerequisites
You have enabled WORM for the bucket when you create it.
Configuring WORM for a Bucket
In the bucket list, click the bucket you want to operate to go to the Objects page.
In the navigation pane, choose Overview.
In the Basic Configurations area, click WORM Retention. The Configure WORM Retention dialog box is displayed.
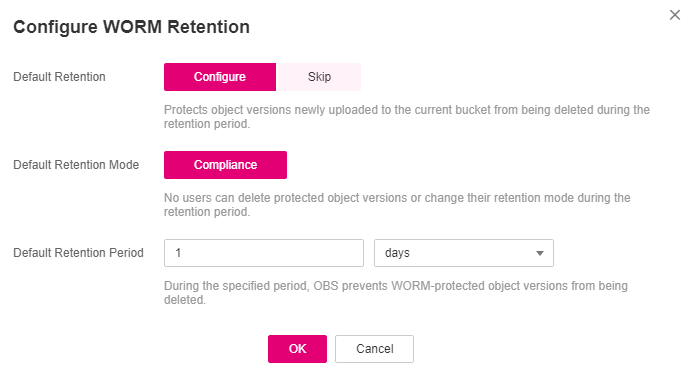
Choose Configure. Keep the default Compliance retention mode and specify a default retention period.
NoteOnly the compliance retention mode is currently supported. In this mode, no users can delete protected object versions or change their retention mode during the specified retention period.
During the specified default retention period, OBS prevents WORM-protected object versions from being deleted. You can configure a retention period in either days (from 1 to 36500) or years (from 1 to 100). The upper limit is 100 years.
When you upload an object to a WORM-protected bucket, the object inherits the WORM retention from the bucket by default. You can also configure a different WORM retention for the object under advanced settings. If both a bucket-level and object-level WORM retention policy are applied to an object, the object-level retention policy will be used.

Figure 1 Configuring a WORM retention policy
Click OK.
Skipping the WORM Retention Configuration
In the bucket list, click the bucket you want to operate to go to the Objects page.
In the navigation pane, choose Overview.
In the Basic Configurations area, click WORM Retention. The Configure WORM Retention dialog box is displayed.
Choose Skip.

Figure 2 Skipping the WORM retention configuration
Click OK.
Extending the Retention Period
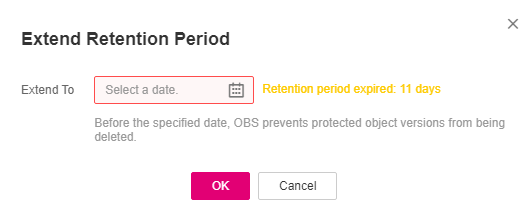
After WORM is configured for an object, you can go to the object details page and extend the retention period of an object version on the Versions page. Before the specified date, OBS prevents protected object versions from being deleted.
In the bucket list, click the bucket you want to operate to go to the Objects page.
In the object list, click the object you want to go to the object details page.
On the Versions tab page, view all versions of the object.
Locate the object version for which you want to extend the retention period, choose Extend Retention Period, and select a date.

Figure 3 Extending the retention period
NoteA retention period can only be extended, but not shortened.
Assume that an object version was configured to be protected until March 30, 2023. If you want to extend the retention period on March 1, 2023, you can extend it to March 31, 2023 or a later date. If you extend the retention period on April 1, 2023, you can extend it to the current day (April 1, 2023) or a later date. If the current day is used, the object version will no longer be protected by WORM after 24:00 on that day.
Manually and Permanently Deleting Objects from a WORM-Enabled Bucket
In the Deleted Objects list, objects cannot be permanently deleted from a WORM-enabled bucket. In a WORM-enabled bucket, if an object has no retention policy configured or its retention policy has expired, you can manually delete a desired object version on the object's Versions tab page. If an object version is within the retention period, it cannot be deleted.
In the bucket list, click the bucket you want to operate to go to the Objects page.
In the object list, click the object you want to go to the object details page.
On the Versions tab page, view all versions of the object.
Find the object's current version and choose Extend Retention Period to check its retention status.
NoteIf the object version is within the retention period, you will see a message indicating the remaining retention days.
If the retention for the object version has expired, you will see a message indicating the retention expiration days.
If the object version has no retention policy configured, you will not see a message indicating the retention status.
Confirm that the current object version is out of the retention period or has no retention policy configured, and choose Delete.
Verify that the object is no longer displayed in the Deleted Objects list after all object versions are deleted.
Using a Lifecycle Rule to Delete Objects from a WORM-Enabled Bucket
You can configure a lifecycle rule to let OBS automatically expire and delete objects in a WORM enabled bucket. To realize this, the objects must have no retention policies configured or their retention policies have expired. If the objects are within their retention period, they cannot be deleted.
In a WORM-enabled bucket, folders cannot be permanently deleted from the Deleted Objects list. To permanently delete a folder, you can only configure a lifecycle rule.
In the bucket list, click the bucket you want to operate to go to the Objects page.
In the navigation pane, choose Basic Configurations > Lifecycle Rules.
Click Create.
Configure a lifecycle rule.
Configure parameters under Basic Information:
Status: Select Enable to enable this lifecycle rule after the configuration.
Rule Name: It identifies a lifecycle rule. The rule name must be no longer than 255 characters.
Prefix: It is optional.
If this field is configured, objects with the specified prefix will be managed by the lifecycle rule. The prefix cannot start with a slash (/) or contain two consecutive slashes (//), and cannot contain the following special characters:
\:*?"<>|If this field is not configured, all objects in the bucket will be managed by the lifecycle rule.
Configure parameters under Current Version or Historical Version:
Delete Objects After (Days): After this number of days since the last update, OBS will expire and then delete the objects meeting the specified conditions. The days set here must be larger than any of the days configured for the transition actions.
Suppose that you last updated the following files in OBS on November 7, 2023:
log/notConfigured-1.log (This file has no WORM retention policy configured.)
log/expired-1.log (The WORM retention policy configured for this file has expired.)
doc/withinRetention-1.doc (The WORM retention policy configured for this file expires on November 30, 2023.)
Then on November 10, 2023, you last updated the following files:
log/notConfigured-2.log (This file has no WORM retention policy configured.)
log/expired-2.log (The WORM retention policy configured for this file has expired.)
doc/withinRetention-2.doc (The WORM retention policy configured for this file expires on November 30, 2023.)
On November 10, 2023, you set the objects prefixed with log to expire one day later. You might encounter the following situations:
Objects log/notConfigured-1.log and log/expired-1.log last updated on November 7, 2023 might be deleted after the last system scan. The deletion could happen on November 10, 2023 or November 11, 2023, depending on the time of the last system scan. doc/withinRetention-1.doc will not be deleted.
Objects log/notConfigured-2.log and log/expired-2.log last uploaded on November 10, 2023 might be deleted on November 11, 2023 or November 12, 2023, depending on whether they have been stored for over one day (since their last update) when the system scan happened. doc/withinRetention-2.doc will not be deleted.
NoteFor more information about how to configure lifecycle rules, see Configuring a Lifecycle Rule.
Click OK.