Create an EVS Disk
Scenarios
EVS disks can be used as system disks or data disks for servers.
System disks can only be created together with servers and are automatically attached.
A system disk can have a maximum of 1,024 GiB, and a data disk 32,768 GiB.
Data disks created together with servers are automatically attached.
After servers are created, any data disks added on the cloud server console are automatically attached.
After servers are created, any data disks added on the EVS console need to be manually attached.
This section describes how to separately create disks on the EVS console.
Procedure
Log in to the management console.
Under Storage, click Elastic Volume Service.
The disk list page is displayed.
Click Create Disk.
Configure basic disk information according to Table 1.
Table 1 Disk parameters¶ Parameter
Sub-Parameter
Description
Example Value
Region
-Mandatory
Resources are region-specific and cannot be used across regions through internal network connections. For low network latency and quick resource access, select the nearest region.
eu-ch2
AZ
-Mandatory
The availability zone (AZ) where you want to create the disk.
Note
Disks can only be attached to the servers in the same AZ.
The AZ of a disk cannot be changed after the disk has been created.
eu-ch2-01
Disk Specifications
Disk Type
Mandatory
The available disk types are as follows:
High I/O
Ultra-high I/O
Note
When a disk is created from a snapshot, the disk type of the new disk will be consistent with that of the snapshot's source disk.
For more information about disk types, see Disk Types and Performance.
Ultra-high I/O
Disk Size (GiB)
Mandatory
The disk size. Only data disks can be created on the current page, and the disk size ranges from 10 GiB to 32,768 GiB.
Note
When you use a backup to create a disk, the disk capacity must be greater than or equal to the backup size. In the condition that you do not specify the disk capacity, if the backup size is smaller than 10 GiB, the default capacity 10 GiB will be used as the disk capacity; if the backup size is greater than 10 GiB, the disk capacity will be consistent with the backup size.
When you use a snapshot to create a disk, the disk capacity must be greater than or equal to the snapshot size. In the condition that you do not specify a disk capacity, if the snapshot size is smaller than 10 GiB, the default 10 GiB will be used as the disk capacity; if the snapshot size is greater than 10 GiB, the disk capacity will be consistent with the snapshot size.
100 GiB
Create from
Backup
Snapshot
Image
Optional
If you choose Create from Backup, the backup data is used to create the disk.
Click Create from and choose Backup. On the displayed page, select the target backup and click OK.
Note
One backup cannot be used for concurrent disk creation operations at the same time. For example, if you are creating disk A from a backup, this backup can be used to create another disk only after disk A has been created.
If a disk is created from a backup of a system disk, the new disk can be used as a data disk only.
If you choose Create from Snapshot, the snapshot data is used to create the disk.
Click Create from and choose Snapshot. On the displayed page, select the target snapshot and click OK.
Note
The disk type of the new disk is the same as that of the snapshot's source disk.
The device type of the new disk is the same as that of the snapshot's source disk.
For details about the disk creation from snapshots, see Creating an EVS Disk from a Snapshot.
If you choose Create from Image, the image data is used to create the disk.
Click Create from and choose Image. On the displayed page, select the target image and click OK.
Note
The device type of the new disk is the same as that of the image's source disk.
Create from Backup: autobackup-001
Create from Snapshot: snapshot-001
Automatic Backup
-CBR lets you back up EVS disks and ECSs and use the backups to restore data. After you configure automatic backup, the system will associate the EVS disk with the backup vault and apply the selected policy to the vault to periodically back up the disk.
Do not use: Skip this configuration if backup is not required. If you need backup protection after a disk has been created, log in to the CBR console, locate the desired vault, and associate the disk with the vault.
Use existing:
Select an existing cloud backup vault from the drop-down list.
Select a backup policy from the drop-down list, or log in to the CBR console and configure a desired one.
Auto assign:
Set the name of the cloud backup vault, which can contain a maximum of 64 characters, including letters, digits, underscores (_), and hyphens (-), for example, vault-f61e. The default naming rule is vault_xxxx.
Enter the vault capacity, which is required for backing up the disk. The vault capacity cannot be less than the size of the disk to be backed up. The value ranges from the disk size to 10,485,760 in the unit of GiB.
Select a backup policy from the drop-down list, or log in to the CBR console and configure a desired one.
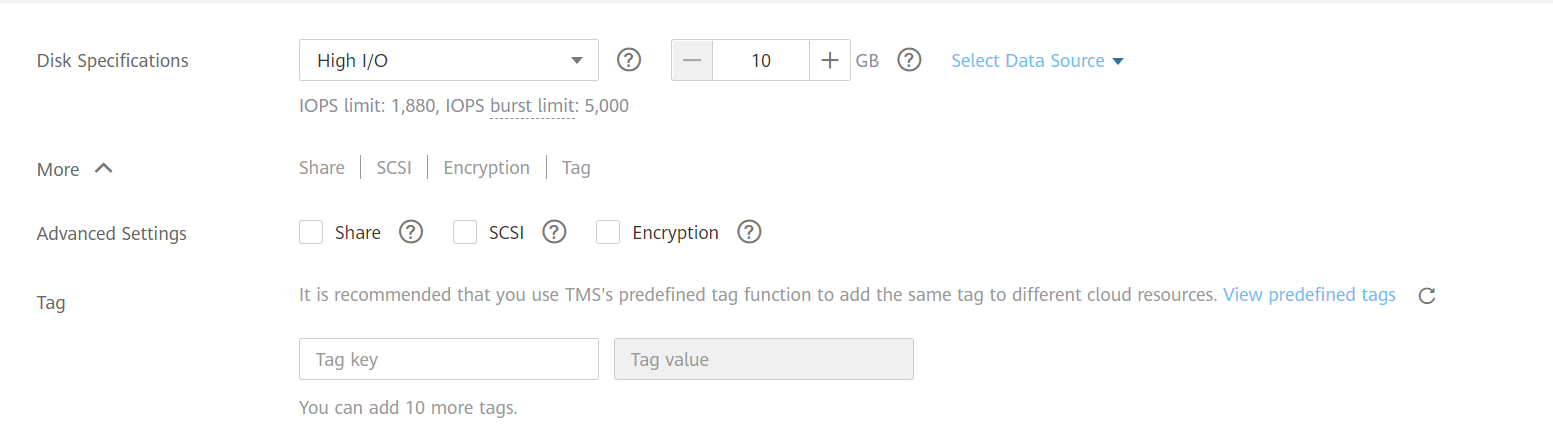
-More
Advanced Settings
Share
SCSI
Encryption
Optional
Share
If you select Share, a shared disk is created. A shared disk can be attached to up to 16 servers. If you do not select Share, a non-shared disk is created, and the disk can be attached to one a server only.
If you select both SCSI and Share, a shared SCSI disk is created.
Note
The sharing attribute of a disk cannot be changed after the disk has been created.
For details about shared EVS disks, see Managing Shared EVS Disks.
SCSI
If you select SCSI, a SCSI disk is created. Such disks allow the server OS to directly access the underlying storage media and send SCSI commands to the disks. If you do not select SCSI, a VBD disk is created. That said, the disk device type is VBD, the default device type.
Note
The device type of a disk cannot be changed after the disk has been created.
For details about the ECS types, OSs, and ECS software supported by SCSI EVS disks, see Device Types and Usage Instructions.
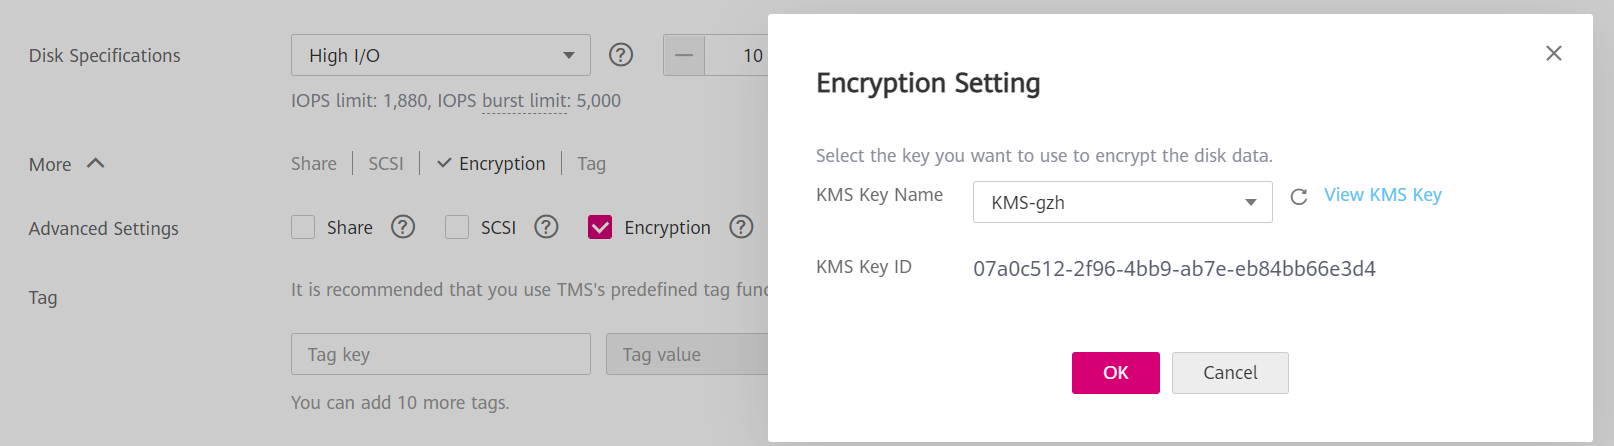
Encryption
The encryption function on this console is used for data disk encryption only.
System disk encryption relies on the image. For details, see the Image Management Service User Guide.
To use the disk encryption function, select Encryption. The displayed dialog box contains the following parameters:
Create Agency
An agency is a trust relationship between two tenants or services. A tenant can create an agency to grant resource access rights to another tenant or service. If the KMS access rights are not granted to EVS, the Create Agency dialog box will be displayed. Otherwise, it will not be displayed.
Click Yes to grant the KMS access rights to EVS. After the rights have been granted, EVS can obtain KMS keys to encrypt or decrypt EVS disks.
After the KMS access rights have been granted, follow-up operations do not require the rights to be granted again.
KMS Key Name
KMS Key Name is displayed only after the KMS access rights have been granted.
KMS Key Name is the identifier of the key, and you can use KMS Key Name to specify the KMS key that is to be used for encryption. One of the following keys can be used:
Default Master Key: After the KMS access rights have been granted to EVS, the system automatically creates a Default Master Key and names it evs/default.
CMKs: Existing or newly created CMKs. For details, see Management > Creating a CMK in the Key Management Service User Guide.
Note
Before you use the encryption function, KMS access rights need to be granted to EVS. If you have the right to grant the permission, grant the KMS access rights to EVS directly. If you do not have this permission, contact a user with the security administrator rights to grant KMS access rights to EVS, then repeat the preceding operations.
The encryption attribute of a disk cannot be changed after the disk has been created.
For details, see EVS Encryption.
-Tag
Optional
During the EVS disk creation, you can tag the EVS resources. Tags identify cloud resources for purposes of easy categorization and quick search.
A tag is composed of a key-value pair.
Key: Mandatory if the disk is going to be tagged
A tag key can contain a maximum of 36 characters, including letters, digits, and underscores (_).
Value: Optional if the disk is going to be tagged
A tag value can contain a maximum of 43 characters, including letters, digits, underscores (_), periods (.), and hyphens (-).
Note
A maximum of 10 tags can be added for an EVS disk.
Tag keys of the same EVS disk must be unique.
Except for tagging the disk during disk creation, you can also add, modify, or delete tags for existing disks. For details, see Managing a Tag.
For details about tags, see the Tag Management Service User Guide.
-Disk Name
-Mandatory
If you create disks individually, this parameter value is used as the actual disk name.
The name can contain a maximum of 64 characters.
If you create disks in a batch, this parameter value is used as the prefix of disk names, and one disk name will be composed of this parameter value and a four-digit number.
The name can contain a maximum of 59 characters.
For example, if you create two disks and set volume for Disk Name, the EVS disk names will be volume-0001 and volume-0002.
Quantity
-Optional
The number of disks to be created. The default value is set to 1, which means only one disk is created. Currently, you can create up to 100 disks at a time.
Note
If the disk is created from a snapshot, batch creation is not possible, and this parameter must be set to 1.
1
Click Create Now.
On the Details page, check the disk details.
If you do not need to modify the specifications, click Submit.
If you need to modify the specifications, click Previous.
Go back to the disk list page and view the disk status.
When the disk status changes to Available, the disk is successfully created.